Problem-solving guide
Luggage wheel mounting patterns: what to record before comparing parts
Document fixing count, hole spacing, base footprint, recess depth, handedness and shell interface so a visually similar wheel assembly is not mistaken for a fit.
People-first rule: Start with the failure or identification question, then collect evidence. Do not shop by appearance first and work backward toward a fit claim.
Core user job: Describe the mounting interface well enough to reject false visual matches.
Fast framework: describe the interface, not just the wheel
When two assemblies look alike, the mounting interface is usually the fastest way to eliminate a false match. Record fixing count + hole geometry + base footprint + recess/shell interface + position as one package.
Mounting features that change fit
| Feature | Record | Why it matters |
|---|---|---|
| Fixing count | Number of screws/rivets/studs actually retaining the assembly | Different counts often signal a different base or shell interface. |
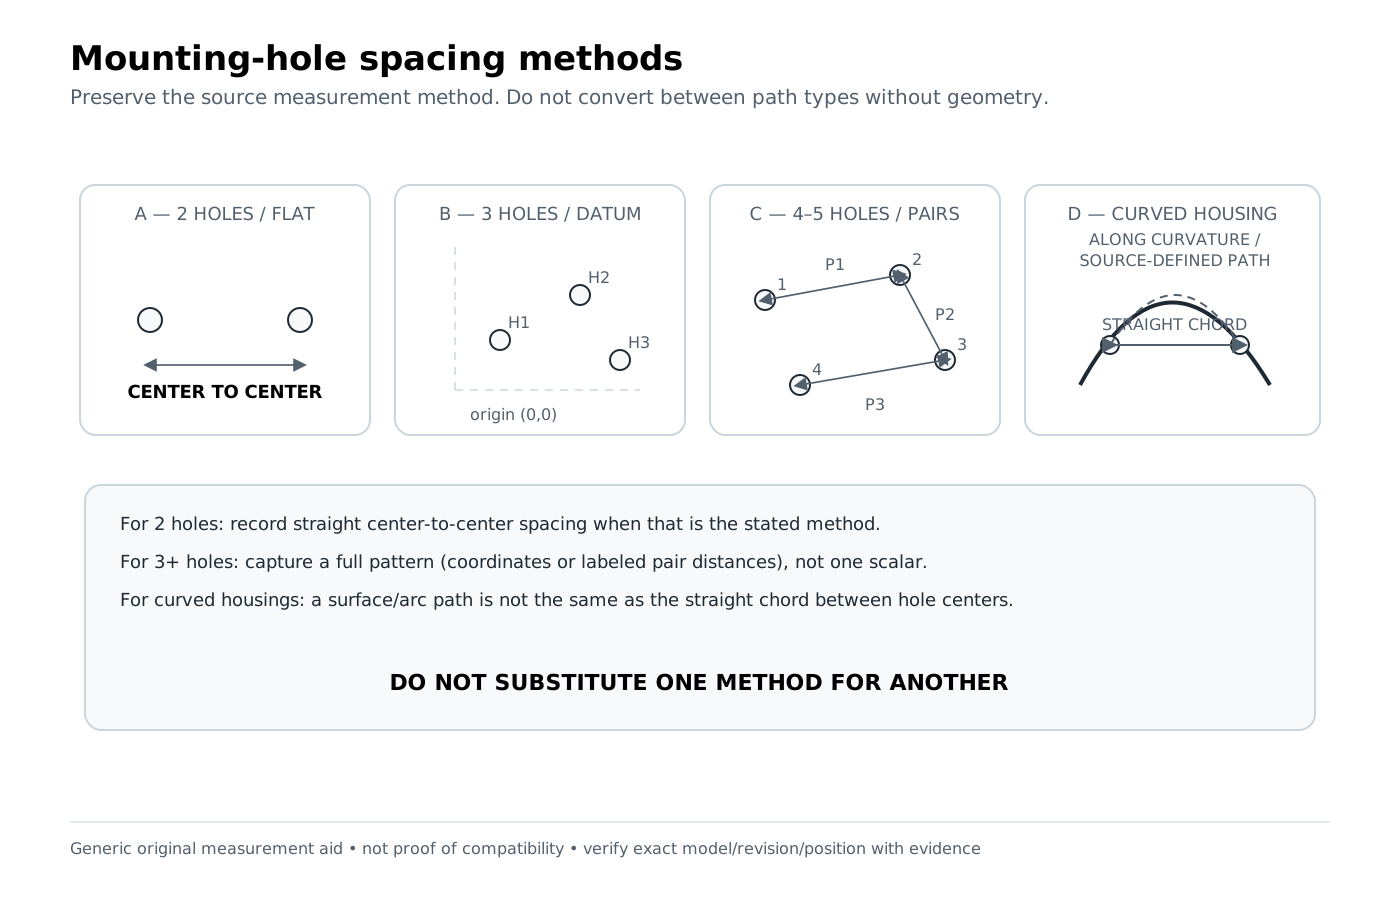
| Hole pattern | Center-to-center distances; note which holes the measurement connects | A single “spacing” number is ambiguous on 3- or 4-hole patterns. |
| Footprint | Base/housing length and width | Prevents an assembly from overlapping ribs, shell curves or trim. |
| Recess/depth | Envelope into or behind the shell | A base can match at the surface and still collide internally. |
| Handedness/position | Left/right and corner orientation | Mirrored shapes can use different IDs or lips/offsets. |
| Fastener type | Screw, rivet, captive nut, stud, washer/plate stack | Do not assume missing hardware is included or reusable. |

Identification workflow
- Find the suitcase label/style ID and search exact evidence first.
- Photograph the assembly from outside and, where safely visible without destructive disassembly, the mounting interface.
- Count fixings and sketch the pattern before measuring.
- Measure center-to-center between named holes; do not measure edge-to-edge and call it hole spacing.
- Record housing/base envelope and the available recess/clearance.
- Keep position/handedness with the measurement record.
- If the only match is geometry from a generic component listing, keep it as a candidate—not a verified fit.
Common mounting-pattern mistakes
- Taking one diagonal measurement on a four-hole pattern and assuming the pattern is fully described.
- Ignoring shell curvature or a molded recess that prevents a flat base from seating.
- Comparing external dimensions while missing an internal post or boss.
- Treating two measurements rounded to the same nominal value as exact.
- Drilling new holes because a part is “close.” This guide does not recommend structural modification to force a fit.
Accepted database examples
| Accepted database example | Mounting lesson | State |
|---|---|---|
| L-2326 housing | Publishes a 95.25 × 82.55 × 73.03 mm housing envelope and 38.10 mm hole spacing. Useful for elimination, not exact suitcase fit. | UNVERIFIED |
| L-2839 housing | A similar component class publishes a different 82.55 × 82.55 × 53.98 mm envelope and 31.75 mm hole spacing. | UNVERIFIED |
| Travelpro left housing P40718W0101 | Exact source-backed side identity outranks visual similarity. The right housing is a different official part ID. | VERIFIED |
Boundary: Hole spacing, base size or recess dimensions are elimination filters. They cannot upgrade a generic or measurement-only candidate to VERIFIED model compatibility.